Sunday, October 31, 2010

Sugar Cookie Bars


Happy Halloween! I'm so excited it's Halloween this weekend!! My favourite holiday and time of year. I've wanted to make Halloween sugar cookies and decorate them for years but this year was the first I actually did it! It was fun but stressful because I have never worked with royal icing really. I made some of the "flooding" icing too thin so it had air bubbles and didn't harden properly. But I've learned some things that will make next time easier. I was really wanting to make these creepy coffin cookies but I didn't plan very well and thinned my white icing before I had the chance to draw out skeletons. Next time! Anyway I just wanted to share a photo of these with you to spread some Halloween cheer.


I also want to share this other sugar cookie bar recipe with you. I'm sure many of you have seen it around on other blogs and there's a reason for it. It's really good and so easy to make. The cookie part is really thick and soft, not like a regular sugar cookie that's thinner and more crisp/hard. The frosting is good but very messy. Well messy in the sense of if you want to travel somewhere with these, you can't just throw them all into a container, you have to carefully layer them with parchment. But it's worth it! The most exciting part for me was definitely buying animal sprinkles to put on top.

If this sounds good, you might also like:
Gingerbread Pumpkin Bars
Cream Cheese Swirl Blondies
Snickerdoodle Blondies
Peanut Butter Squares with Milk Chocolate and Oats

Sugar Cookie Bars
Adapted from Anissa's Kitchen

I would omit the milk in the frosting next time - it made it look kind of weird (though it tasted fine).

1 cup unsalted butter, room temperature
2 cups sugar
4 eggs
1 tbsp vanilla
5 cups flour
1 tsp salt
1/2 tsp baking soda

Cream butter and sugar until fluffy. Add eggs, one at a time, mixing after each egg. Add vanilla & mix well. In a separate bowl combine flour, salt & soda & stir with a whisk to combine. Add to wet mixture and mix just until combined. Spread on a greased baking sheet (use a 13 x 18 pan). Bake at 375 degrees for 10-15 min, until light golden brown or until a toothpick comes out clean. Cool completely and frost.

Frosting
1 cup unsalted butter, room temperature
2 tsp vanilla
pinch of salt
3 3/4 cups powdered sugar
5 tbsp milk
food coloring (if desired)

For frosting cream butter until smooth and creamy. Add vanilla and salt. Add powdered sugar in 1-2 cup increments until combined, then add milk & mix until smooth and spreading consistency. Add food coloring, if desired. Spread over cooled cookies.

Thursday, October 21, 2010

Black Bean and Zucchini Chilaquiles


I've made chilaquiles before, but the last time was with crushed tortilla chips. While I did really like that black bean chilaquile, I think I prefer this one which uses corn tortillas. Oh corn tortillas, how I love you. This is basically a Mexican casserole. Black beans, zucchini, chilies, onion, bell pepper, tomatoes, cheese. Mmm. I'll be making it again for sure. It's really hard to find good and relatively healthy vegetarian casseroles, as I've lamented before.


If this sounds good, you might also like:
Frijoles, Etc. Casserole
Summer Strata with Spinach, Basil & Roasted Garlic Custard
Southwest Brunch Bake
Butternut Squash Casserole

Black Bean and Zucchini Chilaquiles
Adapted from The Vegetarian Family Cookbook (found on Epicurious)

1/2 tablespoon olive oil
1 chopped onion
1 green bell pepper, diced
One 28-ounce can crushed or puréed tomatoes
1 teaspoons chili powder
2 teaspoon dried oregano
1 teaspoon ground cumin
One 16- to 20-ounce can black beans or 2 1/2 cups cooked black beans (from about 1 cup dried)
1 medium zucchini, quartered lengthwise and thinly sliced
1 small fresh hot chile pepper, seeded and minced
12 6-inch corn tortillas, torn or cut into several pieces
8 ounces grated Cheddar cheese
Green onions, chopped

1. Preheat the oven to 400°F. Lightly oil a 9- by 13-inch baking pan or 2-quart round casserole (optional).

2. Heat the oil in a large saucepan. Sauté the onion until translucent. Add the bell pepper and continue to sauté until it has softened and the onions are golden. Stir in the tomatoes, seasonings, beans, zucchini, and chile pepper. Bring to a simmer, then simmer gently for 5 minutes.

3. Layer as follows in the prepared pan. Half the tortillas, half the tomato black bean mixture, and half the cheese. Repeat. Bake for 15 to 20 minutes, or until the cheese is bubbly. Let stand for 5 to 10 minutes. Sprinkle with green onions.

Friday, October 15, 2010

Pumpkin Cheesecake


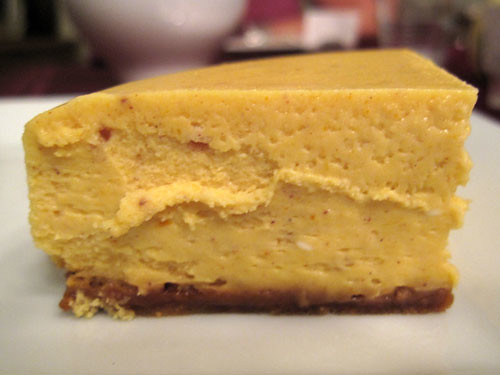
I know I know, this photo (and piece of cheesecake) is a total mess! But I really wanted to share this recipe for pumpkin cheesecake with you, and due to the business of Thanksgiving, I didn't get around to taking a nicer photo of it. But I thought it would be better to have something to show you guys rather than nothing, right? Because this cheesecake is so good.


I'm hoping this Abby photo can make up for the cheesecake one!


The first time I made it was a few Thanksgivings ago. Usually we have pumpkin pie with whipped cream but I wanted to try something different. I warned my brother beforehand because I knew he'd be disappointed if the dessert was something other than pumpkin pie, and now I've got him hooked on this cheesecake. I like to serve it with whipped cream, and if you're feeling fancy you can sprinkle a bit of cinnamon on top. I've also eaten it with ice cream which of course is good too. I would recommend using a 10" springform pan (as you're supposed to) and not being like me and using a 9" springform pan that just isn't big enough. It didn't overflow but it rose up a lot, and resulted in a lot of cracking.


EDIT! October 10, 2011 - I made this cheesecake again for Thanksgiving and this time got a better photo, and better results actually. I halved the filling recipe (but not the crust), and used my four 4" cheesecake pans. I used a water bath and baked them for about 50-55 minutes. They didn't crack and were the most perfect texture. Creamy and soft, and the edges weren't rubbery or overcooked as seems to happen with other cheesecakes I've made.

If this sounds good, you might also like:
Brown-Sugar Apple Cheesecake
Rich Chocolate Cheesecake
Lemon Cheesecake
Cheesecake Pops

Pumpkin Cheesecake
Adapted from The Best of The Best and More

Ginger Snap Crust
1 cup crushed gingersnaps
3 tbsp butter, melted
1 tsp cinnamon
2 tbsp brown sugar

Filling
4 8-oz (250 g) packages cream cheese, softened
1 1/2 cups sugar
5 eggs
1/4 cup flour
2 tsp pumpkin pie spice
14 oz (398 mL) can pumpkin
2 tbsp whipping cream (original recipe calls for rum)

1 cup whipping cream, whipped
Ground cinnamon, optional

Crust: Combine ingredients. Lightly grease a 10" springform pan and line bottom with crumb mixture. Pat firm and chill.

Filling: Preheat oven to 325F. Beat softened cream cheese till fluffy. Slowly beat in sugar. Add eggs, 1 at a time, beating well after each addition. Gradually beat in flour, spices, pumpkin and 2 tbsp whipping cream. Pour batter over crust. Bake for 1 1/2 to 1 3/4 hours, or until filling is set. Cool for an hour. Refrigerate several hours. Garnish with whipped cream and a sprinkle of cinnamon (optional).

Friday, October 8, 2010

Pesto and Chickpea Pasta Salad


I know the time for pasta salads has come and gone for most of you, but I always like a good pasta salad. This one has grape tomatoes, chickpeas, bell pepper, olives, pine nuts and a pesto dressing. It's really simple, quick and easy to put together.

Happy Thanksgiving to all the Canadians out there! I've been looking forward to this long weekend full of family, friends and food. I just pulled a pumpkin cheesecake out of the oven, though sadly I wasn't paying enough attention and the edges are a bit too brown but it will still be yummy.

If this sounds good, you might also like:
Orzo Salad with Chickpeas, Dill and Lemon
French Pasta Salad
Santa Fe Pasta Salad
Greek Barley Salad

Pesto and Chickpea Pasta Salad
Adapted from Bravo! Best of Bridge Cookbook

Dressing
1/2 cup freshly grated Parmesan cheese
1/2 cup basil pesto
4 tbsp red wine vinegar
2 tbsp extra virgin olive oil
3 cloves garlic, minced

Salad
6 cups pasta (about 12 oz/375 g)
1 lb grape tomatoes, halved
1 yellow or red bell pepper, chopped
1 cup Kalamata olives, halved
1/2 cup toasted pine nuts
19 oz can chickpeas, rinsed and drained

In a large bowl, whisk together dressing ingredients, Set aside.

Cook pasta according to package directions. Drain and rinse under cold running water. In a large bowl, combine pasta, tomatoes, red pepper, olives and chickpeas. Add dressing and toss to coat. Cover and refrigerate for 1 hour to let flavours develop. Just before serving, taste the salad for seasoning. Stir in pine nuts.

Monday, October 4, 2010

Chocolate Peanut Butter Mousse Cake


Every time I go to post about a cake I've made, I always think "I really should make cakes more often!" Yet I seem to make them fairly infrequently. Maybe I should set up some sort of challenge for myself like one new cake a month or something, hmm. I made this chocolate peanut butter mousse cake when we had some people over for dinner and we really liked it. Chocolate wafer crust, topped with a layer of peanut butter mousse, which is topped with a layer of chocolate mousse, which is then topped with bittersweet chocolate glaze. I was scared the mousse layers might deflate but they seemed to hold their own. I wish I'd taken a photo of a slice of the cake because it cuts very nicely, but at that point I just wanted to eat it! The cake is really rich so a thin slice is enough. Though if you have leftovers in your fridge, a thin slice might turn into many thin slices.

The only caution I have with this cake is that the bittersweet chocolate glaze has you add vanilla extract to the chocolate/cream mixture, and once I added the vanilla it made the chocolate kind of lumpy. It tasted fine and set up okay, but I wouldn't add it next time.


If this sounds good, you might also like:
Rich Chocolate Cheesecake
Chocolate Volcanoes
Chocolate Mousse Layer Cake
Chocolate Pots de Creme

Chocolate Peanut Butter Mousse Cake
Adapted from The Cake Book

Makes on 9 inch cake, serving 10

Chocolate Wafer Crust
1 1/2 cups (180 g) Nabisco Famous chocolate wafer cookie crumbs
4 tbsp unsalted butter, melted

Peanut Butter Mousse
5 ounces cream cheese, softened
2 tbsp unsalted butter, softened
1 1/4 cups (144 g) confectioners' sugar
3/4 cup creamy peanut butter
1/4 tsp salt
2 1/2 cups heavy cream

Chocolate Mousse
5 ounces bittersweet chocolate, coarsely chopped
3.5 ounces milk chocolate, coarsely chopped
1/3 cup whole milk
1/3 cup granulated sugar
1 tsp vanilla extract

Bittersweet Chocolate Glaze
3 ounces bittersweet chocolate, chopped
1/3 cup heavy cream
1/2 tsp vanilla extract (I added this but wouldn't next time)

Make the crust
1. Lightly grease the bottom of a 9x3 inch springform pan. In a medium bowl, stir together the cookie crumbs with the melted butter until combined. Pat the crumb mixture into the bottom of the pan in an even layer. Refrigerate the crust while you make the peanut butter mousse.

Make the peanut butter mousse
2. In the bowl of an electric mixer, using the paddle attachment, beat the cream cheese and butter at medium-low speed until creamy, about 1 minute. Add the confectioners' sugar and mix until well blended. Add the peanut butter and salt and mix until blended, scraping down the sides of the bowl as necessary. Remove the bowl from the mixer stand and set aside.

3. In a clean mixer bowl, using the whisk attachment, beat the heavy cream at high speed until soft peaks form. Gently fold 1 cup of the whipped cream into the peanut butter mixture until almost blended. Fold in another 1 1/2 cups of the whipped cream until completely blended.

4. Scrape the mousse into the prepared pan and spread it into an even layer. Refrigerate while you make the chocolate mousse. Cover the remaining whipped cream and refrigerate until ready to use.

Make the chocolate mousse:
5. Place the chocolates in the bowl of a food processor and process until finely ground. (Leave the chocolate in the food processor.)

6. In a small saucepan, combine the milk and sugar and bring to a boil over medium heat, stirring frequently until the sugar dissolves. With the food processor running, pour the hot milk through the feed tube, and process until the chocolate is completely melted. Scrape down the sides of the bowl, add the vanilla extract, and process until blended. Scrape the mixture into a large bowl.

7. Using a rubber spatula, gently fold one-third of the reserved whipped cream into the mousse. Fold in the remaining cream until completely blended. Scrape the mousse onto the peanut butter mousse layer. Loosely cover the cake and freeze for at least 1 hour, until firm.

Bittersweet Chocolate Glaze
8. Place the chocolate in the bowl of a food processor and process just until finely ground. (Leave the chocolate in the food processor.)

9. In a small saucepan, bring the cream to a boil. Remove from the heat and add the chocolate to the pan. Stir until the chocolate is completely melted and the glaze is smooth. Stir in the vanilla extract. Transfer the glaze to a small bowl. Let cool for about 10 minutes before using.

Glaze the cake
10. Run a sharp thin-bladed knife under hot water and wipe dry, then run the knife between the cake and the side of the pan to release the cake; reheat the knife as necessary. Remove the side of the pan. Pour the glaze over the top of the cake, trying not to let it drip down the sides, and, using a small metal spatula, spread the glaze evenly over the top of the cake.

11. Refrigerate the cake for at least 1 hour before serving.

12. To serve, slice the cake with a hot knife, wiping it clean between each cut.

Store in the refrigerator, loosely covered, for up to 3 days.